

Capturing screenshots on your Acer laptop can be an essential task for a variety of reasons, such as documenting information, sharing content with others, or creating visual aids for your projects. Fortunately, Acer laptops, like most Windows-based systems, provide several methods to capture screenshots effectively. Understanding these methods will help you choose the most suitable one for your needs.
Utilizing the Print Screen Key
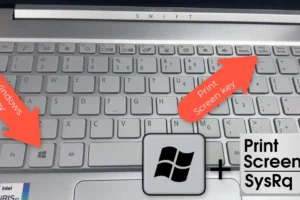
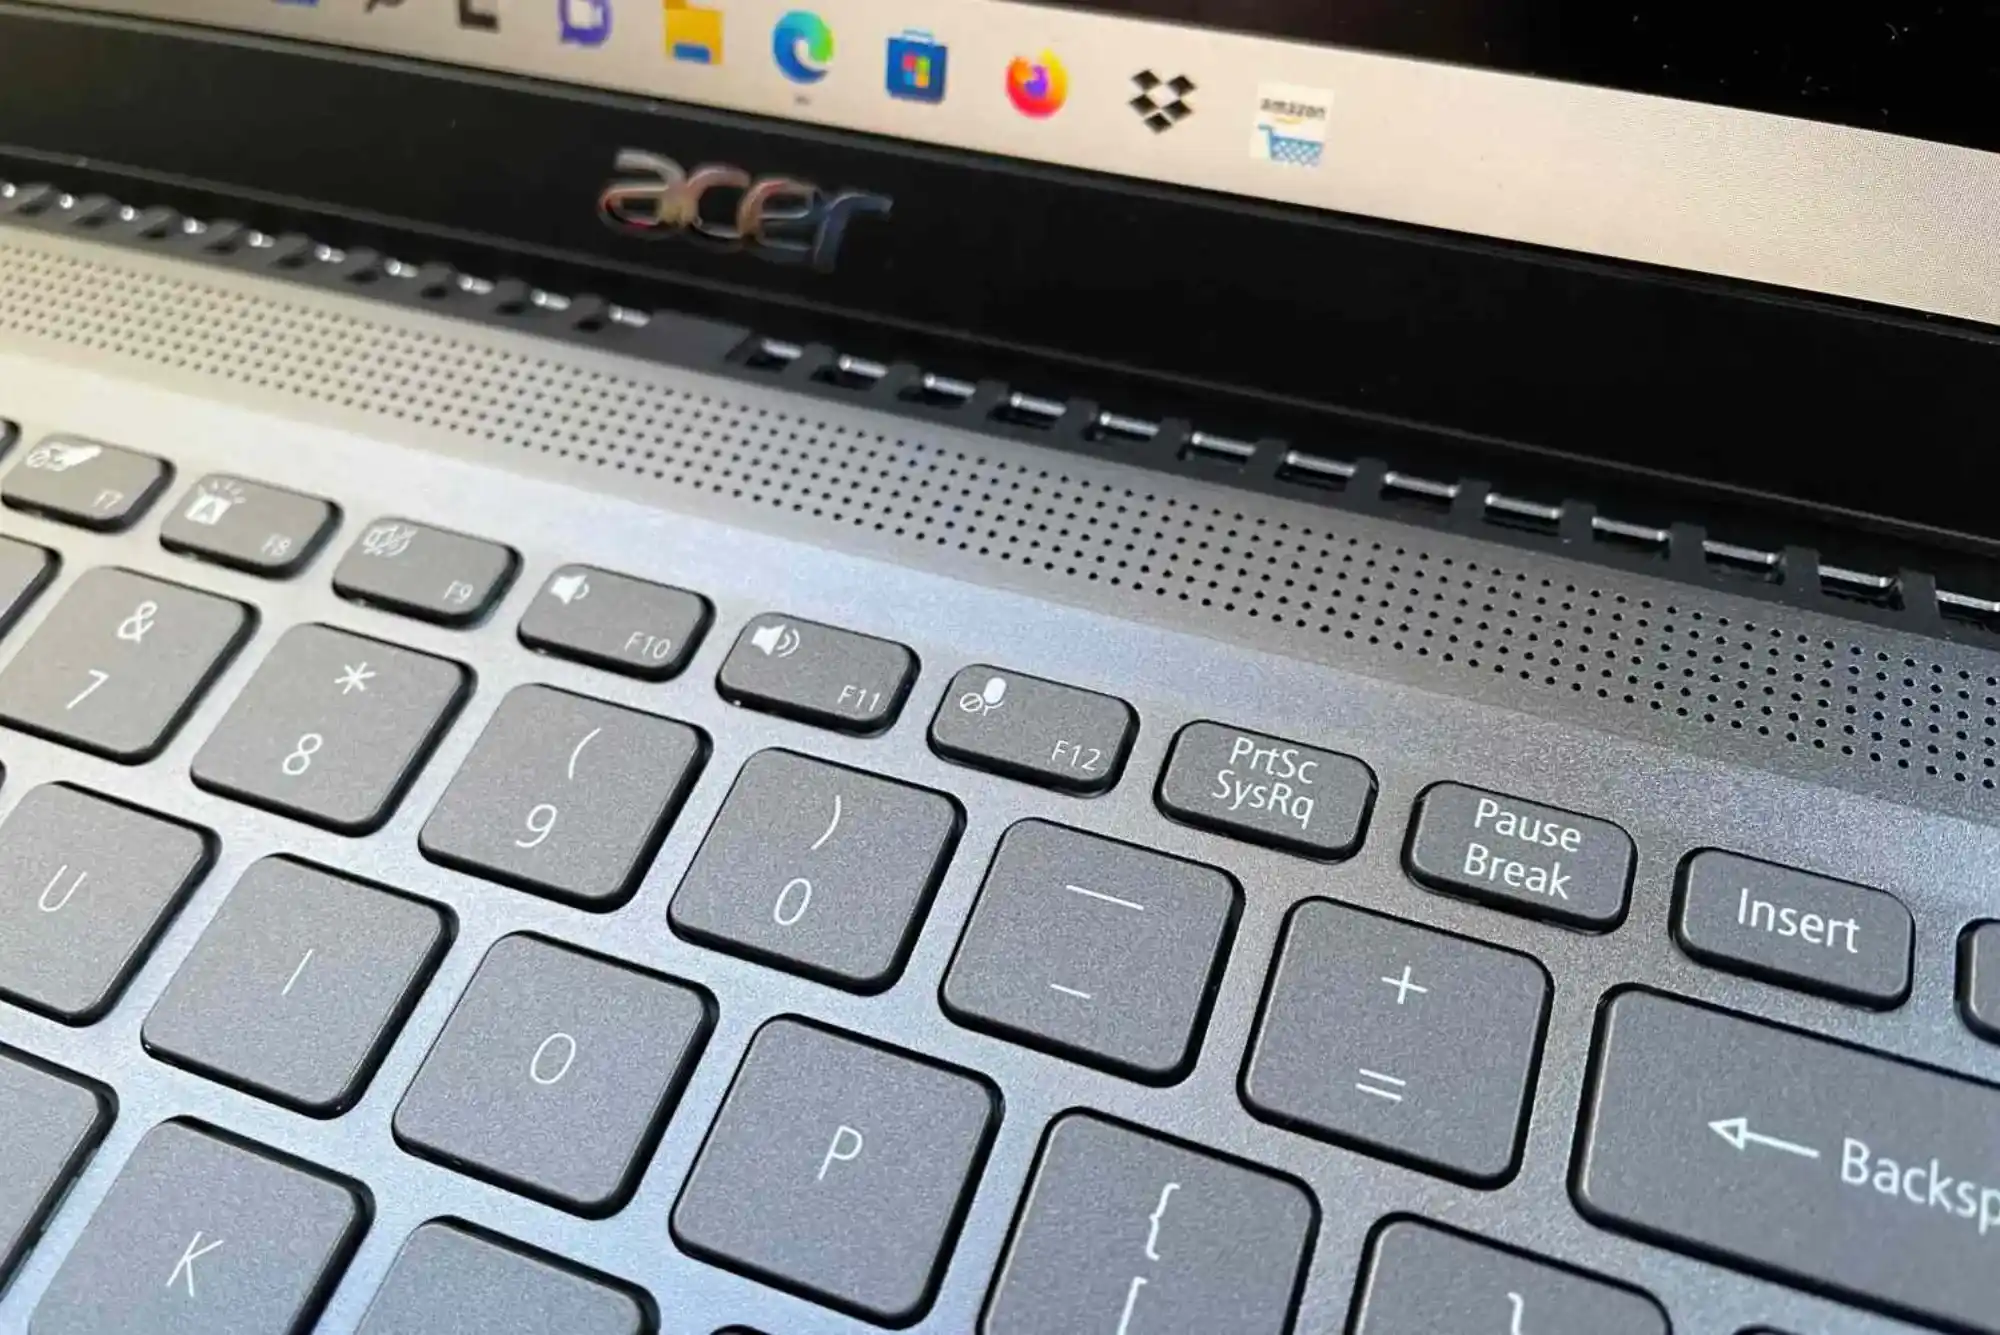
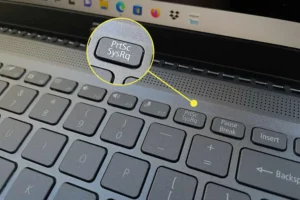
One of the most common methods for taking a screenshot on an Acer laptop involves using the PrtScn (Print Screen) key located on the keyboard. This key is typically situated in the top row, near the function keys. Pressing the PrtScn key captures the entire screen and saves it to your clipboard. This means that the screenshot is not saved directly as a file but is copied to your clipboard, ready to be pasted into another application.
To save or edit this screenshot, you need to open an image editor or document application. For example, you can use Microsoft Paint, which is a simple image editor that comes pre-installed with Windows. Open Paint and then paste the screenshot by pressing Ctrl + V. Once the screenshot appears in the Paint window, you can crop, annotate, or adjust the image as needed. After editing, you can save the screenshot to your desired location on your laptop by selecting “File” and then “Save As.”
If you prefer to capture only the active window rather than the entire screen, you can use the Alt + PrtScn keyboard shortcut. By pressing Alt in conjunction with the PrtScn key, you capture only the window that is currently in focus. This method is particularly useful if you have multiple windows open and only want to capture the content of one specific window. Similar to capturing the full screen, the screenshot is copied to your clipboard, so you will need to paste it into an application like Paint to save or edit it.
Exploring the Snipping Tool
Windows also includes a utility called the Snipping Tool, which offers more flexibility in capturing screenshots compared to the Print Screen key. To use the Snipping Tool, you need to search for it in the Start menu. Once you open the Snipping Tool, you are presented with several options for capturing screenshots.
The Snipping Tool allows you to choose from different snip types. You can select a free-form snip, which lets you draw a custom shape around the area you want to capture, or a rectangular snip, which lets you select a rectangular area of the screen. Additionally, you can choose a window snip to capture a specific window or a full-screen snip to capture the entire screen. After making your selection, the Snipping Tool captures the image and opens it in a new window where you can annotate or edit the screenshot as needed. Once you are satisfied with your adjustments, you can save the screenshot directly from the Snipping Tool interface.
Utilizing Snip & Sketch
Another useful tool for capturing screenshots is Snip & Sketch, which is a more recent addition to Windows. To use Snip & Sketch, you need to search for it in the Start menu and open the application. Snip & Sketch provides an easy-to-use interface for capturing and editing screenshots.
To initiate a screenshot using Snip & Sketch, click on the “New” button within the application. This will allow you to select the type of screenshot you want to capture. Options include rectangular or free-form snips, as well as capturing a specific window or the full screen. Once you capture the screenshot, Snip & Sketch provides a set of editing tools that let you annotate, crop, or highlight parts of the image. After making your desired changes, you can save the screenshot directly from Snip & Sketch.
Leveraging the Windows Key + Shift + S Shortcut
For a more efficient and quick method, you can use the Windows Key + Shift + S keyboard shortcut. This shortcut brings up a small menu at the top of your screen, allowing you to select the type of screenshot you want to capture. The options include capturing a rectangular area, free-form shape, specific window, or the full screen.
After selecting the type of screenshot you wish to capture, the image is copied to your clipboard. You can then paste the screenshot into any image editor or application that supports image insertion by pressing Ctrl + V. This method is particularly handy for quickly capturing specific portions of your screen without needing to open additional applications.
Using the Acer Quick Access Tool
Acer laptops may come equipped with a proprietary utility called the Acer Quick Access tool, which sometimes includes a screenshot feature. To use this tool, locate it in your Start menu or system tray. If the tool provides a screenshot option, you can use it to capture your screen. Depending on the features of the Acer Quick Access tool, you might also have the ability to edit or share the screenshot directly from within the tool.
Taking screenshots on an Acer laptop is a straightforward process with several methods available to meet your specific needs. Whether you use the Print Screen key, the Snipping Tool, Snip & Sketch, keyboard shortcuts, or proprietary tools like Acer Quick Access, you can easily capture and manage your screen content. Each method offers unique features, so you can choose the one that best fits your requirements, whether you need a quick screenshot or more advanced editing capabilities.